5_TFTeSPI
前言
貌似在国内,使用Arduino的框架方式去开发某个项目并不流行,看起来在使用单片机开发的时候,都是自己从底层开始。很巧的是,最近使用ESP32开发的某个项目的基础原型,用的是Arduino框架,这个项目的原作者是一位外国人,与他聊天表示十分友好hhhhh。这里可以重新说明一下关于这个项目的开发框架。ESP32的开发方式有两种:
- 一种是基于乐鑫官方提供的ESP-IDF的方式,使用ESP32-SDK进行开发。
- 另一种是基于Arduino框架的方式进行开发。 然而事实是这样的,不管是使用IDF还是Arduino,都是基于原始的SDK进行的,而Arduino只是对SDK再进行了一次接口封装而已。
关于TFT_eSPI库
对于Arduino来说,现成库是很多很多的,就像人家搭好的梯子你直接拿来用。而TFT_eSPI就是一个很现成的例子。项目中由于需要驱动一个LCD+Touch,LCD使用的是ST7796S,touch芯片使用的是XPT2046。这看起来就是很经典、淘宝上很常见的LCD模块。遇见这样的,当然首先很开心,因为有很多代码可以用,因此通过查阅资料,果断使用TFT_eSPI这个库,github地址如下: https://github.com/Bodmer/TFT_eSPI
将它放入工程的位置之后,就可以用了。但事情并没有想象中顺利:
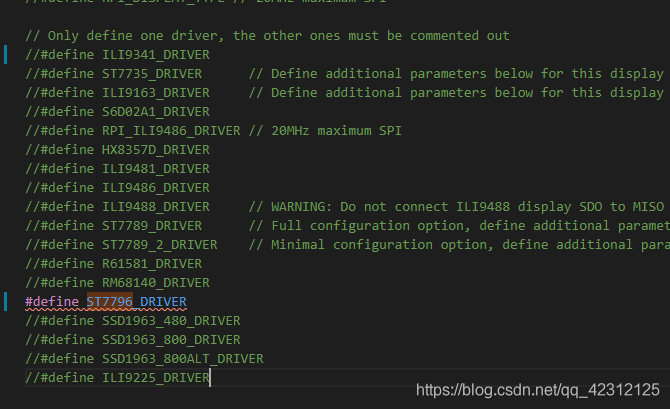
1)由于自己使用的屏幕是480320,而TFT_eSPI提供的ST7796驱动用的是320240,因此是不能直接驱动使用的。
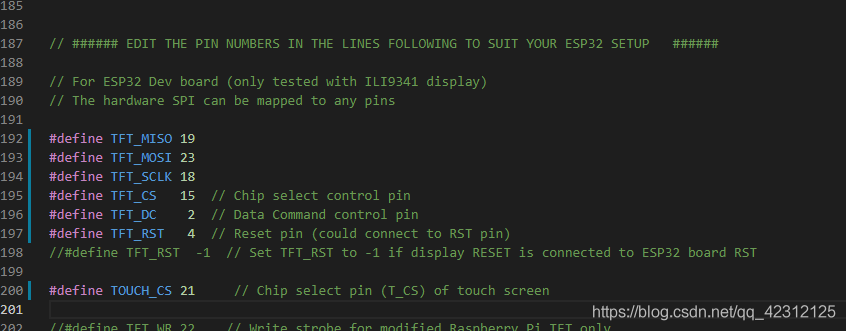
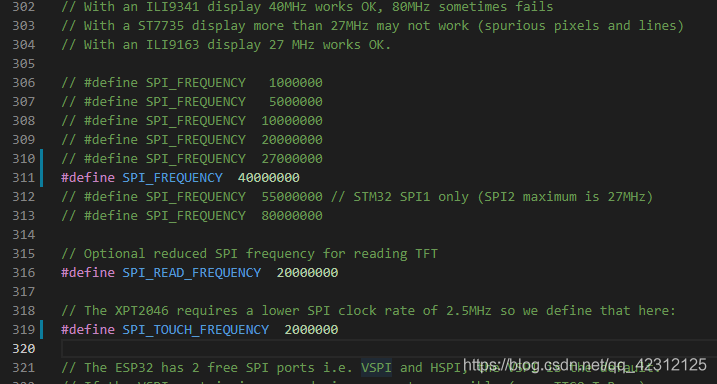
2)由于屏幕、触控的电路是自己设计的,与别的配置不一样,也是不能直接使用的,所以需要修改配置文件。
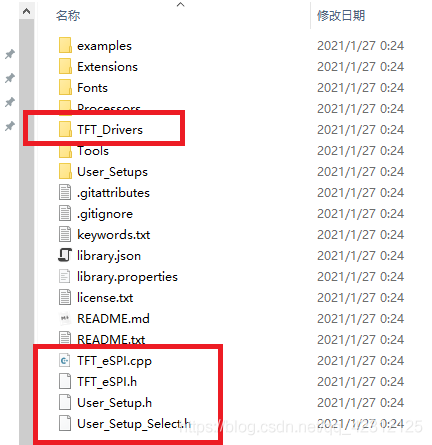
从文件夹组成来看,并不算复杂,而我们只需要关注这几个就可以了,就算是TFT_eSPI,再牛逼的库,底子都应该是用SPI或其它所驱动,这个是核心,因此引脚的定义是首要的。
目录结构
TFT_eSPI的配置使用
- 修改配置文件 User_Setup.h
- 选择LCD驱动芯片
- 修改你的lcd脚位以适配硬件电路
- 添加或删除字体文件

- 修改spi驱动频率
TFT_eSPI常用函数
//创建对象
TFT_eSPI tft = TFT_eSPI()
TFT_eSPI tft = TFT_eSPI(320,240)        // 在创建对象的时候设置屏幕尺寸


//初始化
void init(uint8_t tc = TAB_COLOUR)
void begin(uint8_t tc = TAB_COLOUR)
//注意:begin与init是相同的,可以在源码中看到,在begin直接调用了init函数。

//清屏
void fillScreen(uint32_t color) // 用某一颜色填充屏幕

//屏幕方向
void setRotation(uint8_t r);      // 设置显示图像旋转方向,r可选参数为0、1、2、3
uint8_t getRotation(void)         // 读取当前旋转角度
//注意:0, 1, 2, 3 分别代表 0°、90°、180°、270°,4为镜像。

//颜色转换
uint16_t color565(uint8_t red, uint8_t green, uint8_t blue)    // 将8位红色、绿色和蓝色转换为16位
uint16_t color8to16(uint8_t color332)                          // 将8位颜色转换为16位
uint8_t  color16to8(uint16_t color565)                         // 将16位颜色转换为8位
uint32_t color16to24(uint16_t color565)                        // 将16位颜色转换为24位
uint32_t color24to16(uint32_t color888)                        // 将24位颜色转换为16位

//颜色反转
void invertDisplay(bool i)      //反转所有显示颜色i = true反转,i = false正常


//文字设置
/* 游标 */
void setCursor(int16_t x, int16_t y)                     // 设置tft.print()的光标
void setCursor(int16_t x, int16_t y, uint8_t font)       // 设置tft.print()的光标和字号
int16_t getCursorX(void)                                 // 读取当前光标x位置(随tft.print()移动)
int16_t getCursorY(void)                                 // 读取当前光标y位置
/* 设置字体颜色 */
void setTextColor(uint16_t color)                        // 仅设置字符的颜色
void setTextColor(uint16_t fgcolor, uint16_t bgcolor, bool bgfill = false)   // 设置字符前景色和背景色,可选的背景填充以平滑字体
/* 设置字号 */
void setTextSize(uint8_t size)                           // 设置字符大小乘数(这会增加像素大小)
void setTextWrap(bool wrapX, bool wrapY = false)         // 打开/关闭TFT宽度和/或高度中文本的换行
/* 文本基准位置 */
void setTextDatum(uint8_t datum)                         // 设置文本基准位置(默认为左上角)
uint8_t getTextDatum(void)                               // 获取文本基准位置
/* 设置背景填充,可以用作清除指定区域的显示 */
void setTextPadding(uint16_t x_width)                    // 以像素为单位设置文本填充(背景空白/重写)宽度
uint16_t getTextPadding(void)                            // 获取文本填充
//注意:从上面函数可知,想要打印显示的文本,只需使用 tft.print() 函数即可。
Sprites 精灵
Sprite在概念上是一个不可见的图形屏幕,它保存在处理器的RAM中。图形可以被绘制到精灵中,就像它们可以直接绘制到屏幕上一样。精灵完成后,可以在屏幕上的任何位置绘制。如果有足够的内存,则精灵可以与屏幕大小相同,并用作帧缓冲区。精灵默认使用16位颜色,位深度可以设置为8位(256色),或1位(任意2种颜色),以减少所需的RAM。在ESP8266上,可以创建的最大16位彩色Sprite约为160x128像素,这消耗了40Kbytes的RAM。在ESP32上,工作区RAM比数据表所暗示的更为有限,因此16位彩色Sprite限制为200x200像素(约80Kbytes),8位Sprite限制为320x240像素(~76kbytes)。每像素1位的Sprite只需要9600字节就可以得到一个完整的320 x 240屏幕缓冲区,这是支持使用2种颜色位图字体的理想选择。
可以创建一个或多个精灵,精灵可以是任意像素宽度和高度,仅受可用RAM的限制。16位彩色深度精灵所需的RAM是(2 x宽度x高度)字节,对于8位颜色深度的精灵,所需RAM是(宽度x高度)字节。可以根据需要在草图中动态创建和删除精灵,这意味着在屏幕上绘制精灵后,可以释放RAM,然后可以运行基于WiFi的RAM密集型代码,并且正常的图形操作仍然有效。
在sprite中绘制图形非常快,对于那些熟悉Adafruit“graphicstest”示例的人来说,整个测试在160x128 sprite中在18ms内完成。sprite的使用示例可以在“Examples/sprite”文件夹中找到。
精灵可以用一种指定为“透明”的颜色绘制到TFT上,参见Transparent_Sprite_Demo示例。
如果一个ESP32板安装了SPIRAM(即PSRAM),那么sprite将使用PSRAM内存,并且可以创建大的全屏缓冲精灵。全屏精灵渲染时间较长(320 x 240 16位精灵约45毫秒),所以请记住这一点。
以下是Sprite 独有的函数:
//声明
TFT_eSprite yourSpriteName = TFT_eSprite(&tft);

/*
1.创建、删除Sprite
  创建sprite所需的内存是:
   1位色深:1bit / pixel
   4位色深:4bit / pixel
   8位色深:1Byte / pixel
   16 位色深: 2 Byte / pixel
*/
//创建一个 宽x高像素 的sprite,返回一个指向RAM的指针
//如果需要,Sketch 可以将返回值转换为 (uint16_t*) 以获得 16 位深度
void*  createSprite(int16_t width, int16_t height, uint8_t frames = 1);
void*  getPointer(void);//如果未创建,则返回一个指向精灵或 nullptr 的指针,用户必须转换为指针类型
bool   created(void);   //如果精灵已经创建,则返回真

void   deleteSprite(void);//删除精灵以释放 RAM

//2.设置色深
//设置或获取颜色深度为 4、8 或 16 位。可用于更改现有精灵的深度,但会将其清除为黑色,如果重新创建精灵,则返回一个新指针。
void*  setColorDepth(int8_t b);
int8_t getColorDepth(void);

//3.调色板
//设置4位深度精灵的调色板。仅使用前 16 种颜色。
void     createPalette(uint16_t *palette = nullptr, uint8_t colors = 16);       // RAM中的调色板
void     createPalette(const uint16_t *palette = nullptr, uint8_t colors = 16); // FLASH中的调色板
void     setPaletteColor(uint8_t index, uint16_t color); //将单个调色板索引设置为给定的颜色
uint16_t getPaletteColor(uint8_t index);//获取给定调色板索引处的颜色

//4.绘制

//4.1.字符
void     drawChar(int32_t x, int32_t y, uint16_t c, uint32_t color, uint32_t bg, uint8_t font);//在 Adafruit GLCD 或 freefont 中绘制单个字符
//在屏幕上绘制一个 unicode 字形。任何 UTF-8 解码都必须在调用 drawChar() 之前完成
int16_t  drawChar(uint16_t uniCode, int32_t x, int32_t y, uint8_t font);
int16_t  drawChar(uint16_t uniCode, int32_t x, int32_t y);

//4.2.滚动、旋转

//设置滚动区域,从左上角定义x,y,宽度和高度。颜色(可选,默认为黑色)用于填充滚动后的间隙
void     setScrollRect(int32_t x, int32_t y, int32_t w, int32_t h, uint16_t color = TFT_BLACK);

//滚动 定义区域 dx,dy 像素。负值向上、左滚动;正值向右、下滚动。向上、向下滚动是可选的(默认是没有向上/向下滚动)。
//Sprite 坐标系不移动,移动的是像素
void     scroll(int16_t dx, int16_t dy = 0),

void     setRotation(uint8_t rotation);//设置Sprite 的旋转坐标(仅适用于 1位色深的Sprite )  显示器内部硬件中的 CGRAM 旋转
uint8_t  getRotation(void);

//将 Sprite 的旋转副本推送到具有可选透明颜色的 TFT
bool     pushRotated(int16_t angle, uint32_t transp = 0x00FFFFFF);   // Using fixed point maths

//将 Sprite 的旋转副本推送到另一个具有可选透明颜色的不同 Sprite
bool     pushRotated(TFT_eSprite *spr, int16_t angle, uint32_t transp = 0x00FFFFFF);

//获取此 Sprite 旋转副本的 TFT 边界框
bool     getRotatedBounds(int16_t angle, int16_t *min_x, int16_t *min_y, int16_t *max_x, int16_t *max_y);

//获取此 Sprite 的旋转副本的目标 Sprite 边界框
bool     getRotatedBounds(TFT_eSprite *spr, int16_t angle, int16_t *min_x, int16_t *min_y,
                                                           int16_t *max_x, int16_t *max_y);

//获取旋转的 Sprite wrt 枢轴的 TFT 边界框
void     getRotatedBounds(int16_t angle, int16_t w, int16_t h, int16_t xp, int16_t yp,
                          int16_t *min_x, int16_t *min_y, int16_t *max_x, int16_t *max_y);

uint16_t readPixel(int32_t x0, int32_t y0);//读取 x,y 处像素的颜色并以 565 格式返回值
uint16_t readPixelValue(int32_t x, int32_t y);//返回 x,y 处像素的数值(滚动时使用)

//4.3.其他
//  TFT_eSPI类的绘制几何图形、线条等的函数Sprite都可以使用,重复的不再记录。


void    fillSprite(uint32_t color); //用颜色填充sprite

//将图像(位图)写入sprite
void     pushImage(int32_t x0, int32_t y0, int32_t w, int32_t h, uint16_t *data, uint8_t sbpp = 0);
void     pushImage(int32_t x0, int32_t y0, int32_t w, int32_t h, const uint16_t *data);

//将精灵推到 x, y 处的 TFT
void     pushSprite(int32_t x, int32_t y);
void     pushSprite(int32_t x, int32_t y, uint16_t transparent);
bool     pushSprite(int32_t tx, int32_t ty, int32_t sx, int32_t sy, int32_t sw, int32_t sh)

//将sprite推送到 x,y 处的另一个sprite。此函数在目标sprite (dspr) 类中调用 了pushImage()
bool     pushToSprite(TFT_eSprite *dspr, int32_t x, int32_t y);
bool     pushToSprite(TFT_eSprite *dspr, int32_t x, int32_t y, uint16_t transparent);

//与抗锯齿字体相关的函数
void     drawGlyph(uint16_t code);  //向sprite光标位置写入一个字符
void     printToSprite(String string);//向sprite光标位置写入字符串
void     printToSprite(char *cbuffer, uint16_t len);
int16_t  printToSprite(int16_t x, int16_t y, uint16_t index);
TFT_eSPI更多函数
我也查找了一下,网上好像没有 TFT_eSPI 的 API,开源的代码中好像也没提供,但是不要怕,我们可以从源码中的注释查看每个函数的说明。
仔细观察便可发现,使用 TFT_eSPI 是都是直接使用 TFT_eSPI 的对象进行调用的,所以我们只要看查看 TFT_eSPI.h 和 TFT_eSPI.cpp 文件中的注释即可,如下图所示
#include <TFT_eSPI.h>

#define TFT_GREY 0x5AEB  // New colour

/*Change to your screen resolution*/
static const uint16_t screenWidth = 128;
static const uint16_t screenHeight = 160;
//TFT_eSPI tft = TFT_eSPI();  // Invoke library
TFT_eSPI tft = TFT_eSPI(screenWidth, screenHeight); /* TFT instance */

void setup(void) {
  tft.init();
  tft.setRotation(0);
  tft.invertDisplay(0);
}

void loop() {

  // Fill screen with grey so we can see the effect of printing with and without
  // a background colour defined
  tft.fillScreen(TFT_BLACK);
  tft.setRotation(3);//设置屏幕旋转方向

  // Set "cursor" at top left corner of display (0,0) and select font 2
  // (cursor will move to next line automatically during printing with 'tft.println'
  //  or stay on the line is there is room for the text with tft.print)
  tft.setCursor(0, 0, 2);
  // Set the font colour to be white with a black background, set text size multiplier to 1
  tft.setTextColor(TFT_WHITE, TFT_BLACK);
  tft.setTextSize(1);
  // We can now plot text on screen using the "print" class
  tft.println("Hello World!");

  // Set the font colour to be yellow with no background, set to font 7
  tft.setTextColor(TFT_YELLOW, TFT_BLACK);
  tft.setTextFont(7);
  tft.println("12:34");

  // Set the font colour to be green with black background, set to font 4
  tft.setTextColor(TFT_GREEN, TFT_BLACK);
  tft.setTextFont(4);
  tft.println("Groop");
  tft.println("I implore thee,");

  // Change to font 2
  tft.setTextFont(2);
  tft.println("my foonting turlingdromes.");
  tft.println("And hooptiously drangle me");
  tft.println("with crinkly bindlewurdles,");
  // This next line is deliberately made too long for the display width to test
  // automatic text wrapping onto the next line
  tft.println("Or I will rend thee in the gobberwarts with my blurglecruncheon, see if I don't!");

  // Test some print formatting functions
  float fnumber = 123.45;
  // Set the font colour to be blue with no background, set to font 4
  tft.setTextColor(TFT_BLUE);
  tft.setTextFont(4);
  tft.print("Float = ");
  tft.println(fnumber);  // Print floating point number
  tft.print("Binary = ");
  tft.println((int)fnumber, BIN);  // Print as integer value in binary
  tft.print("Hexadecimal = ");
  tft.println((int)fnumber, HEX);  // Print as integer number in Hexadecimal
  delay(10000);
}